Newsela launched in 2013 with a bold mission: Meaningful classroom learning for every student. Today, our team constantly strives to deliver powerful solutions that inspire our users.
Science safety rules help students do more than avoid accidents. They help students build the habits they need to observe, test, and investigate with confidence.
This is important no matter where you’re teaching: A lab, the classroom, a shared space, or an outdoor area. Before students start hands-on science, they need clear routines, an intro to using materials safely, and a plan for what to do if something goes wrong.
Jump to
[What are science safety rules?](id-what)
Key Takeaways
●Science safety is broader than lab safety. It applies whenever students use materials, tools, procedures, or shared spaces to investigate science.
●Safety helps students do more science. Clear routines make hands-on learning feel structured, confident, and age-appropriate.
●Safety instruction should start before investigations. Students need shared language and expectations before they handle tools, materials, or equipment.
Science safety rules are the routines, procedures, and expectations that help students explore science responsibly. They apply in labs, classrooms, STEM stations, outdoor spaces, and anywhere else students are experimenting and using science materials.
Science safety vs. lab safety
How science safety and lab safety relate
Science safety is the broader planning lens and lab safety is the more
specific layer you apply when an activity carries more risk.
Scroll left to right to see the full diagram.
Bottom line: Science safety helps you think broadly about
safe instruction in any setting. Lab safety helps you plan the added
precautions that come with more hazardous materials, tools, or conditions.
Think of science safety as the big picture. It’s something you need to consider any time students observe, build, test, use tools, or work with materials. You need science safety in the lab, but you also need it at a classroom table, in a makerspace, or at an outdoor observation spot.
Lab safety is a part of science safety. It usually refers to formal investigations that take place in a laboratory and involve materials, chemicals, or specialized equipment. Doing these activities or working with these materials may require extra planning, protective gear, or more thorough cleanup procedures.
This difference matters because you may be doing hands-on science without a dedicated lab. While working in your regular classroom or outside might feel “safer” than working in a lab, doing science can still be unpredictable, and being careful matters! Safety extends beyond the lab, and having a science safety routine can help you plan for the space and equipment you actually have, not just the ideal setup.
Why science safety matters before students start investigating
Science safety gives students the foundation they need before they start hands-on work. It helps them understand what to do, how to use materials, and when to stop and ask for help. Plus, each science setting needs clear expectations.
Covering science safety before you ever start a project shifts the concept away from “rules we review once” to “habits we use every time we do science.” The goal isn’t to memorize safety rules, but to practice how scientists think, prepare, and behave before they investigate and conduct experiments.
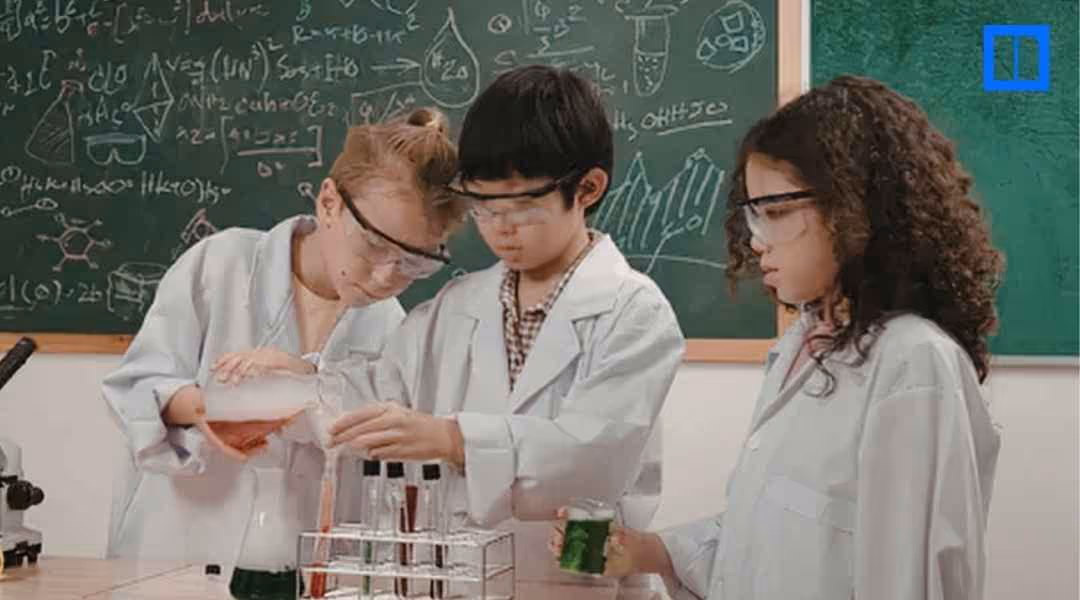
Newsela STEM can support those early safety practices with our Working Scientifically Collection. Before students carry out experiments or design investigations, you can review resources from this collection that introduce science safety, tools, careers, and fieldwork as part of what it means to “do science.”
[Core science safety rules every student should learn](id-rules)
Key Takeaways
●Science safety rules should be specific. Students need clear directions for materials, tools, movement, cleanup, and emergencies.
●The rules should match the activity. Goggles, gloves, cleanup steps, and supervision needs depend on what students are actually doing.
●Safe habits make hands-on science easier. When students know the rules, you can spend less time resetting behavior and more time supporting learning.
Students need science safety rules they can understand, remember, and use across activities. These core rules work for labs, classroom investigations, STEM challenges, tool practice, demos, and everyday science materials.
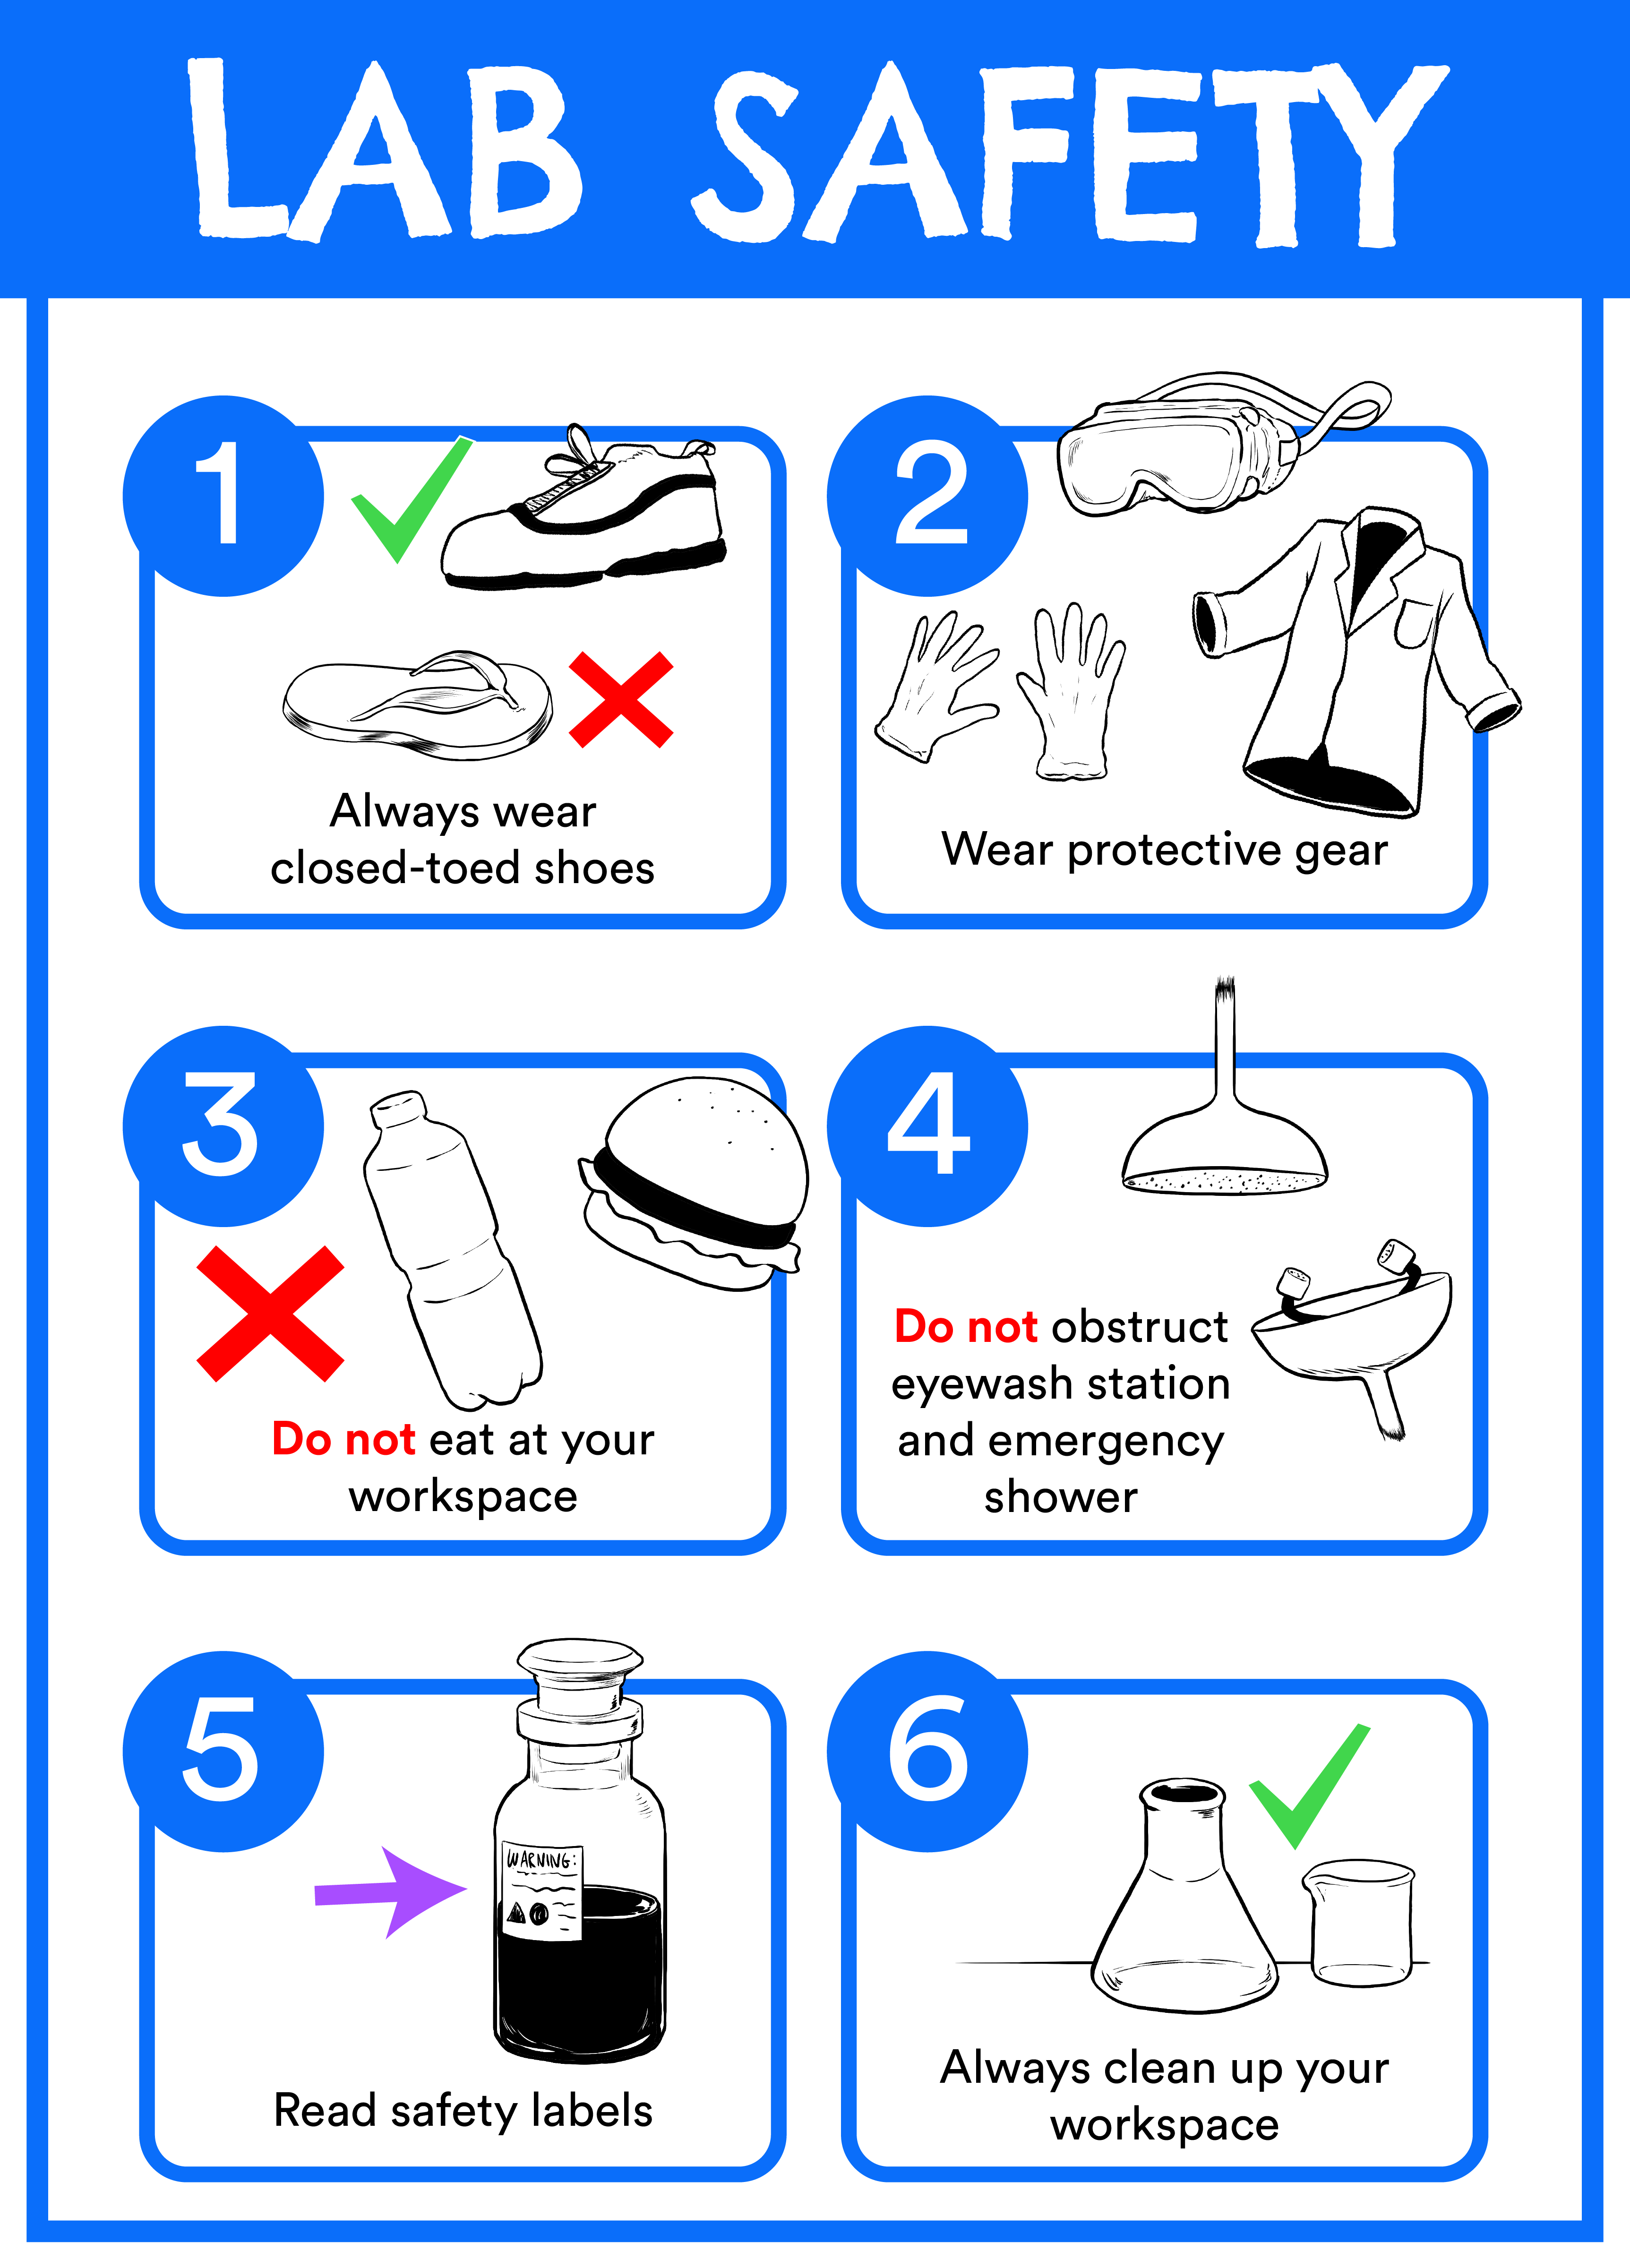
10 Science Safety Rules at a Glance
Review these rules before you begin labs, classroom investigations, STEM challenges, or hands-on science activities.
1
Read directions first
Do not touch materials until you know what the activity requires.
2
Wear the right safety gear
Use goggles, gloves, aprons, or other PPE when the activity calls for it.
3
Keep food and science separate
Do not eat, drink, or place snacks near science tools or materials.
4
Observe materials safely
Smell, touch, and handle materials only the way the teacher directs.
5
Use tools correctly
Handle equipment, models, and classroom tools only as instructed.
6
Take extra care with risky items
Heat, glass, electricity, and sharp objects need closer attention.
7
Keep work areas clear
Clear tables, walkways, and shared spaces so you can move safely.
8
Report problems right away
Tell the teacher about spills, broken tools, injuries, or unsafe behavior.
9
Clean up safely
Dispose of materials the right way and wash hands after the activity.
10
Know the emergency plan
Know what to do if there’s a spill, splash, cut, or fire.
Listen to the leader and always read the procedure
1
Turn the safety rule into student-friendly language
Official rule
Listen to the leader and always read the procedure.
Student-friendly phrasing
Read first. Ask first. Touch last.
Before students touch materials, they need to know what they’re doing and why. Start each activity by having them read the procedure, listen to directions, and ask questions before they begin. This helps prevent “I thought we were supposed to…” moments that can lead to spills, broken tools, or unsafe choices.
This rule still applies when students are using familiar materials. Water, magnets, batteries, or scissors may feel low-risk, but students still need clear directions on how to use them for the specific project and how to do it safely. The goal is to make “pause first” a routine part of doing science.
Wear the right safety gear for the activity
2
Turn the safety rule into student-friendly language
Official rule
Wear the right safety gear for the activity.
Student-friendly phrasing
Gear on before science starts.
Safety gear should match the activity, not just the room. Some science tasks may require just rules and caution. Others may need goggles, gloves, or aprons.
Safety gear is especially important when students work with things like:
Heat.
Glass.
Sharp objects.
Projectiles.
Potential irritants.
Before the activity starts, name the safety gear students will need and explain why they need it. Telling students to “wear goggles because this activity could splash,” may make them more likely to follow the rule.
Keep food, drinks, and science materials separate
3
Turn the safety rule into student-friendly language
Official rule
Keep food, drinks, and science materials separate.
Student-friendly phrasing
Science materials are not snacks.
Food and drinks don’t belong near science materials, tools, or equipment. Even when an activity uses things students could eat, they should treat the workspace differently from a snack table or the lunchroom.
This rule helps prevent accidental tasting, contamination, and confusion about what is safe to touch or put near your face. Plus, it gives you a chance to explain why we avoid contamination to protect the integrity of experiments. Finally, it also supports a clean workspace, which matters during labs, classroom investigations, and STEM challenges.
Smell, touch, and observe materials safely
4
Turn the safety rule into student-friendly language
Official rule
Smell, touch, and observe materials safely.
Student-friendly phrasing
Look closely. Touch only when told. Smell only if directed.
Science often asks students to notice details. They may look closely, compare textures, describe smells, or record changes. But observations still need limits. Students should only smell, touch, or handle materials when their teacher says it’s safe and explains how to do it.
Students may lean too close, touch an unknown material, or bring something near their face before they understand the risk. That’s why you need to explain this rule early and enforce it throughout the lesson. Give clear instructions before handing out materials.
For smell-based observations, students should never sniff chemicals or unknown substances directly. If smelling is part of the activity, demonstrate how to do it safely for that particular activity. Students should also keep their hands away from their eyes, mouth, and face during science activities.
If allergies or sensitivities could affect the activity, build in a quick check before students begin.
Use tools, materials, and equipment only as instructed
5
Turn the safety rule into student-friendly language
Official rule
Use tools, materials, and equipment only as instructed.
Student-friendly phrasing
Use tools the way your teacher shows you.
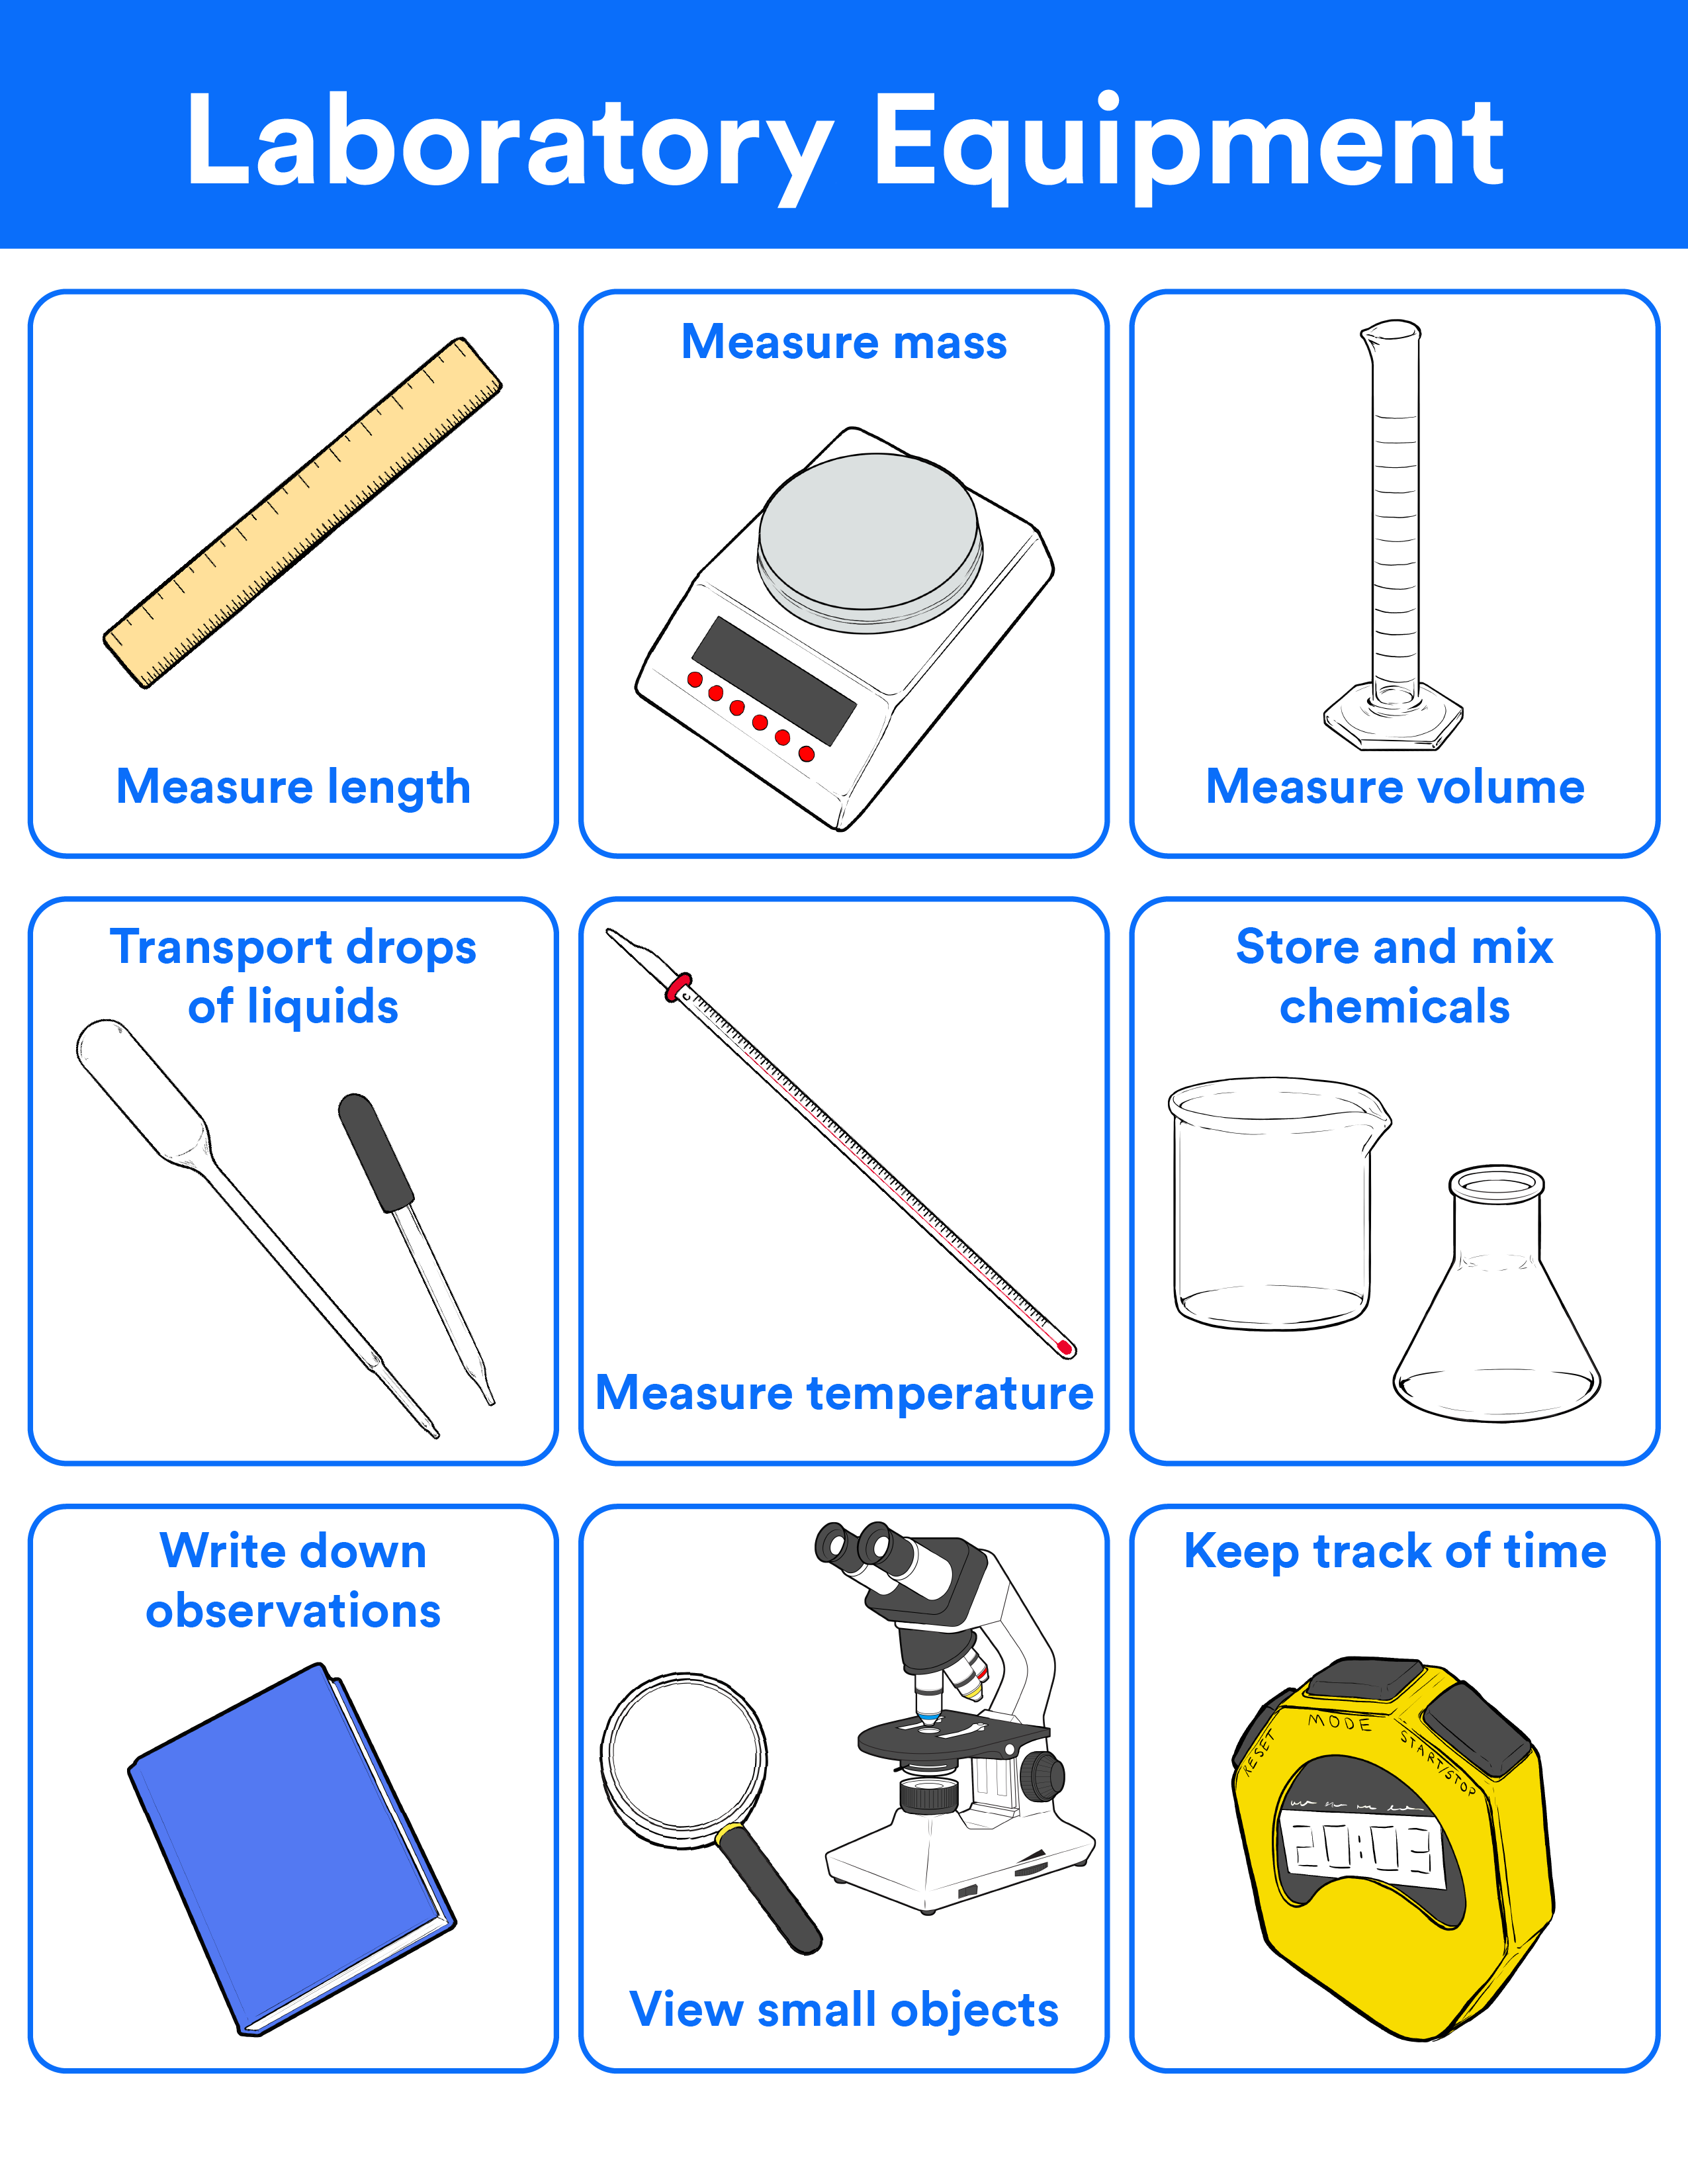
Students need to know what each science tool does, how to use it, and when to leave it alone. This applies to all lab equipment, like microscopes, glassware, and hot plates. It also applies to everyday STEM tools like scissors, magnets, and batteries.
This rule prevents accidents that could happen when students just try to guess how something works. They may think they know how to use a tool because they’ve seen it before, but scientific work often requires more careful handling than everyday use.
At the beginning of the lesson, show students how to use the tool correctly. Model how to carry it, where to place it, what not to do with it, and how to return it. Also, explain that if a tool is broken, cracked, frayed, or not working correctly, they should stop using it and tell you right away.
This step is also a good place to build background knowledge before students ever handle equipment. The Newsela STEM Science Tools text set helps students see what tools scientists use to collect accurate, detailed data and how those tools help them do their work effectively.
Handle heat, glass, electricity, and sharp objects with extra care
6
Turn the safety rule into student-friendly language
Official rule
Handle heat, glass, electricity, and sharp objects with extra care.
Student-friendly phrasing
Slow down around hot, sharp, glass, or plugged-in tools.
Heat, glass, electricity, and sharp objects can be part of strong science learning, but they also pose risks if students rush, joke around, or use them without proper guidance.
For heat, students need to know what’s hot, how to avoid burns or what to do if one happens, and what tools to use when handling heated items. They should never point heated containers toward themselves or others. For glass, students should check for cracks or chips when directed and never pick up broken glass themselves.
Electricity also needs clear boundaries. Keep water away from electrical equipment, check cords before use, and remind students not to plug in or unplug equipment unless told to do so. For sharp objects, model the safe way to cut, carry, pass, and store these tools and objects before they handle them.
Keep work areas and walkways clear
7
Turn the safety rule into student-friendly language
Official rule
Keep work areas and walkways clear.
Student-friendly phrasing
Clear your space so everyone can move safely.
A clear workspace is a safety tool. When tables are crowded or walkways are blocked, students are more likely to trip, spill, bump into equipment, or knock materials onto the floor.
Before any STEM activity, have them clear away anything they don’t need. Keep backpacks, water bottles, and extra supplies away from the work areas. They need to be stored properly, not just thrown onto the floor. Make sure students can move safely between tables, stations, sinks, and exits. Also, if you’re using devices, be mindful of cords.
This rule is important in any space where you’re holding a science class. Even low-risk activities can become unsafe when students don’t have enough space to work. A clear setup also helps you see what students are doing and spot problems early.
Report spills, accidents, and unsafe conditions right away
8
Turn the safety rule into student-friendly language
Official rule
Report spills, accidents, and unsafe conditions right away.
Student-friendly phrasing
Stop. Step back. Tell the teacher.
Students need to know that reporting a problem is a part of safe science behavior. Accidents and mistakes can happen even when you’re being careful. A small spill, cracked tool, loose cord, or broken glass can become a bigger problem if students try to hide it or clean it up the wrong way.
Make the expectation clear before the activity starts: If something spills, breaks, splashes, or feels unsafe, students should stop and tell you right away. They shouldn’t try to fix the problem themselves unless you’ve already taught them how and approved that kind of behavior.
This rule also helps create a calmer classroom culture. Reporting is not tattling, and it’s not going to get you into trouble unless you weren’t already following the rules. It’s how scientists protect themselves and their classmates.
Clean up safely and dispose of materials correctly
9
Turn the safety rule into student-friendly language
Official rule
Clean up safely and dispose of materials correctly.
Student-friendly phrasing
Clean up the right way. Wash hands before you leave.
Cleanup is part of the investigation and you should factor in cleanup time before the lesson even starts. Students need to know where materials go, what they can throw away, and what should never go in the sink or trash without directions.
Give cleanup directions before the activity starts. That way, students aren’t guessing at the end of the class. You can also reiterate the cleanup instructions when that part of the activity arrives. Even simple classroom investigations can create unsafe cleanup moments if students rush or mix materials that should stay separate.
Students should also wash their hands after science activities, even when using familiar materials. This routine helps separate the science workspace from the rest of the classroom day. It also builds good habits to prevent cross-contamination or accidental exposure.
Know what to do in an emergency
10
Turn the safety rule into student-friendly language
Official rule
Know what to do in an emergency.
Student-friendly phrasing
Stop. Stay calm. Follow the emergency plan.
Students should know the emergency plan before they need it. This includes what to do in the event of spills, injuries, allergic reactions, or other unsafe situations.
Keep the plan simple and repeat it often. Students don’t need to know how to handle emergencies themselves, but they do need to know how to stop, move away from danger, and get help quickly. They should also know the classroom stop signal, evaculation route, and adult-only-use safety equipment.
This rule is especially important because students may want to panic or freeze during an emergency. If they’ve practiced what to do, they’re more likely to respond calmly and follow directions.
[How to decide if a science activity is safe for your classroom](id-decide)
Key Takeaways
●Start with what students will do. Safety planning should match the actual task, not just whether the room is called a lab or classroom.
●Plan for your real setup. Room space, sinks, equipment, materials, class size, and student readiness all affect whether an activity is safe.
●Keep a safer fallback ready. Demos, smaller groups, simulations, readings, or modified materials can keep science learning moving when risk is too high.
A safe science activity depends on more than the lesson plan. Before students begin, review all factors that will affect your activity and ensure they’re evenly matched to drive learning and prevent incidents.
Science Activity Safety Check
Use this teacher-facing planning tool before students begin a lab, classroom investigation, STEM challenge, demo, or hands-on science activity.
What will students actually do?
Name the actions: mix, pour, cut, heat, build, test, measure, move, or observe.
What grade band am I planning for?
Match the activity to students’ age, experience, independence, and supervision needs.
What are the possible hazards?
Look for splash, heat, glass, sharp tools, electricity, allergens, spills, or unsafe movement.
Check space, walkways, sinks, stations, exits, storage, ventilation, and access to materials.
Are students ready to work this independently?
Decide if students can follow the procedure, use tools correctly, and stop when redirected.
What is my safer fallback plan?
Prepare a demo, smaller group format, simulation, reading, video, or modified version of the task.
Start with the activity, not the room label
Whether you’re working on science in the classroom or a lab doesn’t matter. The real focus should be on “What will students actually do?” Start by naming the actions in the activity. They can tell you more about the safety needs than the room where you’re running the activity can.
For example, a classroom STEM challenge with scissors, batteries, and moving groups may need more safety planning than a teacher-led lab demo. A low-risk lab observation activity may need even less safety prep. The setup should follow the task.
Consider students’ grade band and independence level
A safe science activity isn’t one-size-fits-all. A safe activity for one grade band may not be safe for another. Students’ age, reading stamina, motor skills, and independence all affect how they handle science materials.
Start by asking what students can do safely on their own right now. Can they read and follow a procedure? Can they stop when redirected? Can they work without rushing or joking around? If not, the activity may need more modeling, smaller steps, or closer supervision.
Grade bands also affect the language you use. Students need directions they can understand before the activity starts. If the procedure is too complex, break it into smaller steps, model the first round, or shift the activity into a teacher-led demo.
Ask what the hazards are
Once you know what students will do, look for what can go wrong. Just as the students need to know what to do in an emergency, you should know what could happen during an activity. A hazard is anything in the activity that could cause harm if not managed, such as materials, tools, or behavior.
Ask yourself what could spill, break, burn, or cut. Then decide what safety routine controls that risk. You may need gear, smaller groups, or different materials. You likely won’t be able to make the activity risk-free, but you can plan for the safest version of any learning experience.
Potential Science Class Hazards
Use this quick scan before an investigation to spot risks that may need extra directions, safety gear, closer supervision, or a safer version of the activity.
Splash or spill hazards
Liquids, powders, soil, or mixtures that could spill, splash, stain, or irritate skin or eyes.
Heat hazards
Hot plates, warm liquids, heated containers, flames, friction, or materials that hold heat.
Glass or sharp tool hazards
Glassware, scissors, blades, probes, pins, broken items, or tools with sharp edges.
Electrical hazards
Batteries, cords, outlets, plugs, circuits, or any equipment used near water.
Trip and movement hazards
Backpacks, cords, crowded walkways, station rotations, shared supplies, or moving groups.
Allergy or sensitivity hazards
Foods, plants, soil, latex, scents, dust, specimens, or materials that could trigger a reaction.
Air quality or odor hazards
Strong smells, fumes, dust, sprays, powders, or activities that need better ventilation.
Crowding and supervision hazards
Too many students at one station, limited visibility, unclear roles, or not enough adult support.
Consider what safety equipment and setup you have
When planning your lesson, check what your room can safely handle. Consider the space, storage, cleanup, and supervision. Then look at activity-specific needs such as safety gear, ventilation, or emergency equipment.
This step is especially important if you teach science in a regular classroom or shared space without a traditional lab. You may still be able to do hands-on science, but the activity may need lower-risk materials, smaller groups, or other adaptations.
If the safety equipment or room setup doesn’t match the activity, adjust it to a safer version that aligns with the learning goal and the conditions you actually have.
Create a safer fallback plan
A fallback plan can be a safer way to reach the same learning goal when the original activity doesn’t fit your room, materials, class size, or student readiness.
Start with the concept you want students to understand and then decide which format gives them the safest path to that goal.
Simulations can also help when the hands-on activity carries too much risk or needs equipment you don’t have. With Newsela STEM and PhET simulations, students can explore science concepts in an interactive format before, after, or instead of a hands-on investigation.
Keep in mind, your fallback plan can also be temporary. You may use it while you reteach a safety routine or adapt the procedure. The point is to keep science learning moving without pushing an activity beyond what your setup can support safely.
[How to teach science safety so students remember it](id-how)
Key Takeaways
●Safety routines need practice. Students remember rules better when they rehearse what safe science looks and sounds like.
●Student-friendly language helps. Short, repeatable phrases make safety expectations easier to recall during hands-on work.
●Safety is part of science literacy. Students need to read procedures, use evidence, ask questions, and explain safe choices like scientists do.
Science safety sticks when it becomes a routine students practice consistently. Use clear language, model the behaviors you expect, and connect safety to the way scientists read, observe, question, test, and communicate.
Teach safety as a routine
Science safety works best when students know what to expect every time they do an activity or investigation. Build it into the rhythm of every lesson.
A simple science safety routine
Use the same routine before, during, and after every hands-on science
activity so students know what safe science should look and sound like.
Preview
Name the activity, materials, top safety reminders, and
cleanup plan.
Model
Show how to read directions, handle materials, move, report
problems, and clean up.
Monitor
Pause to check space, materials, directions, and student
choices.
Reset
Clean up, dispose of materials correctly, wash hands if
needed, and name what went well.
Repeat every time
Scroll left to right to see the full routine.
Routine reminder: The goal is not to repeat every safety
rule every time. It is to make the safest behaviors predictable enough
for students to remember and use.
Practice safety before the first high-risk activity
Students should practice their safety routines before engaging in an activity that poses real risk. You can rehearse the movements and expectations with low-risk materials first. Think of it like teaching stop, drop, and roll. You hope they never have to use it, but it’s better to know what to do in case they do.
Try asking students to read the procedure, put on goggles, move between stations, or report a pretend spill. They can also practice what to do when you give the stop signal.
This kind of rehearsal may feel slow or silly at first (especially for older students), but it saves time in the long run. They’ll be less likely to rush or copy unsafe behavior from classmates when they already know the routine.
You can also use this as a chance to check readiness. If students can’t follow directions with empty containers or craft sticks, they’re not ready to handle glassware, heat, or chemicals.
Use student-friendly language
Students of any age are more likely to remember safety rules when the language is clear, short, and easy to repeat. A rule like “Handle materials only as instructed” is true, but it’s not the phrasing students will remember when they’re excited or working with partners.
Turn each rule into a quick classroom callback. “Handle materials only as instructed” may turn into “Ask first. Use it the right way.” You can even do a real call-and-response in the classroom by starting the phrase and asking students to repeat the end back to you.
Turn science safety rules into student-friendly callbacks
Keep the official rule for accuracy. Then give students a short phrase they can remember and use during hands-on science.
Official rule
Follow the teacher’s directions and read the procedure before touching materials.
Student-friendly callback
Read first. Touch last.
Official rule
Use tools, materials, and equipment only as instructed.
Student-friendly callback
Ask first. Use it the right way.
Official rule
Report spills, accidents, and unsafe conditions right away.
Student-friendly callback
Stop. Step back. Tell the teacher.
Teacher move: Use the same callback every time so students hear it during practice, activities, cleanup, and quick resets.
Keep the official rule in your lesson plan or post expectations in the room. Then, teach the student-friendly version out loud. Practice it, repeat it, and use it for resets.
This approach also helps multilingual learners, younger students, and students who need more processing time. They still learn the full safety rule, but have a fallback phrase they can lean on that’s easier to remember in the moment.
Model the safety behavior you expect
Show students the exact behavior you want to see in the classroom. Show them how to put on goggles correctly or how to read a procedure before you touch materials.
It can also help to model the “almost right” version of a behavior. For example, show them what might happen if they reach for materials too soon. Then, pause and ask, “What should happen first?” This keeps safety instruction active without making it feel like an add-on to your lessons.
When you model, narrate your thinking. Say things like “I’m reading the directions first because I need to know what the materials are for,” or “I’m keeping this space clear so nobody trips while we work.” This helps students connect the rule to its underlying reason.
Modeling doesn’t have to take long. Doing it for as little as 60 seconds before an activity can help clarify the expectations.
Make safety part of science literacy
Science safety isn’t a separate part of science learning. It combines many important science literacy skills, such as understanding vocabulary, following sequences, and asking questions.
You can also use safety rules to build background knowledge. If students know why wearing goggles matters or why they shouldn’t taste materials, they’re more likely to follow the rule because it has a purpose.
Newsela STEM’s Working Scientifically Collection helps you bridge the gap between the rules and the reasons to strengthen science literacy.
Keep the tone confident, not scary
Science safety should help students feel prepared instead of afraid. In a real emergency, we don’t want students to become nervous or shut down, and we don’t want them to be afraid to do hands-on work. On the other hand, if the rules sound too casual, they may not take safety seriously enough.
Aim for a calm, confident tone when discussing science safety. Explain the risks, what safe behavior looks like, and what to do if something goes wrong. Instead of saying “This can be dangerous,” say something like “We need to handle this tool carefully, and here’s how we’ll do that.”
It also helps to frame safety as part of being a scientist. When students realize safety is just a normal part of science, they’re more likely to treat it like a routine instead of a warning.
Use a safety agreement
When you ask students to sign a science safety agreement, you’re asking them to acknowledge that safe behavior is part of doing science, and they understand the responsibility. It also gives you a shared reference point before they start doing lab work, investigations, or STEM challenges.
Keep the agreement practical by outlining the core rules, required safety gear, accident response, and emergency steps. Use student-friendly language when possible, but keep the expectations clear.
The agreement will work best when you do more than just have students sign. Read it together first and explain why each rule matters. It also helps to revisit the agreement throughout the year. Before a higher-risk activity, pull out the rules that matter most for that investigation.
Sample science safety agreement
Use this as a model for a classroom science safety agreement. Review it together, connect it to the activity students are about to do, and practice the routines before students begin.
Student name
Class / period
School year
I agree to these science safety expectations
I will follow directions and read the procedure before I touch materials.
I will use tools, materials, and equipment only as instructed.
I will wear the right safety gear for the activity.
I will keep food, drinks, and science materials separate.
I will keep my workspace and walkways clear.
I will tell the teacher right away if there is a spill, splash, cut, break, or unsafe condition.
I will clean up safely and dispose of materials the right way.
Student-friendly reminder: Read first. Use it the right way. Stop and tell the teacher if something goes wrong.
Before we begin, I understand
What materials we are using today.
What safety gear I need.
What to do if something spills, splashes, or breaks.
Where to move, where to wait, and how to clean up.
How to respond if the teacher gives a stop signal.
Teacher move: Highlight only the rules that matter most for the next activity so the agreement feels connected to real science work.
Student signature
Teacher signature
Date
[What to do when your classroom setup isn’t ideal](id-classroom)
Key Takeaways
●Your room setup matters. Safe science planning should match the space, equipment, supervision, and materials you actually have.
●Adaptation is good teaching. Demos, stations, simulations, readings, and lower-risk materials can help students reach the same learning goal safely.
●Safety concerns should be documented. When the setup is not safe, name what is missing and ask for the support students need.
Not every science activity happens in a lab. You may be teaching in a regular classroom, shared space, or a room without the equipment you wish you had. Start with what your setup can safely support, then adapt the activity so students can still learn.
I don’t have a lab room
You don’t need a lab to teach science. Look at what your existing classroom can safely support and adapt the activity you want to do so it matches your space. Clear tables and walkways, set up a supply station, and decide where work will happen.
For high-movement activities, use stations or small groups instead of whole-class materials. You can also run the activity as a teacher-led demo, with students observing, recording data, or explaining what they notice.
If the activity needs equipment your classroom doesn’t have, don’t force it. Replace the materials, reduce the risk, or move the activity to a safer space. If you plan for the room you have, not the room you want, your regular classroom can still support strong science learning.
I don’t have a sink or eyewash station
If your classroom doesn’t have a sink or eyewash station, avoid activities with chemicals, powders, unknown substances, irritants, or splash risks.
If you want to do an activity that may require emergency rinsing, change the plan. Turn it into a teacher-led demo, or use safer materials, a better-equipped room, or a simulation.
If you’re not sure whether you need a sink or an eyewash station for a particular activity, ask your fellow science educators, such as the science lead, facilities team, or administrator. The safer choice is always to pause and check, not just hope the setup will work.
I only have everyday materials
Everyday materials are great for science and even better for STEM because they make science more accessible. Using what you’ve got is a part of real, everyday science to solve problems and make what can feel like impossible situations actually work.
Real-world STEM connection
Why everyday materials matter in STEM
Everyday materials can help students practice the real work of STEM: solving a problem with constraints, testing ideas, and improving a design with the tools available.
STEM is not always about special equipment
Students can build, test, observe, revise, and explain with simple supplies. The safety work is making sure each material has a clear purpose, clear limits, and a clear cleanup plan.
Use this clip as a quick discussion starter about constraints, creativity, and building a solution from available materials.
Teacher discussion prompts
✓What problem are the engineers trying to solve?
✓What materials do they have, and what limits do those materials create?
✓How is this similar to a classroom STEM challenge?
✓What safety routines would students need before using everyday materials to build or test a design?
But “everyday” isn’t a synonym for “always safe.” Students can still misuse common materials in unexpected ways. Even when using everyday materials, you still need to use the same planning lens: What will students do, what can go wrong, and what routine keeps the activity safe?
Always check each material before students use it. Keep the procedures simple and give students a clear purpose for each material so they know what it’s for and what not to do with it.
You can also use Newsela STEM content before the activity to help students build background knowledge. A short article, text set, or simulation can give students the context they need before they handle materials, test ideas, or make observations.
My class size or behavior makes activities unsafe
Sometimes the activity isn’t the problem. If your class is too big or rowdy, it can make otherwise safe activities unsafe.
Try to reduce the number of students handling materials at once. Use stations, smaller groups, or partner roles. Give each student a clear job, such as materials manager, recorder, or cleanup lead. When students know their role, they may be less likely to crowd, grab, or guess.
If behavior is the concern, pause before the activity becomes unsafe. Reteach the routine with lower-risk materials, practice the stop signal, and model appropriate behavior. Restart the lesson only when the class shows they can continue safely.
Another option is to treat labs or experiments as a reward for appropriate and safe behavior. Make it clear to students that they must demonstrate they can handle lab work before they begin an experiment. When everyone has to work together to get this reward, your students may be more likely to call each other out if they’re not behaving safely.
You can also lower the risk without downgrading learning. Use fewer materials, simpler tools, or simulations before students try a full hands-on version of the activity.
We started an activity, but my students aren’t working safely
If students aren’t working safely, pause the activity right away. Don’t wait for the end of the lesson to address it. A quick reset protects students and gives the class a chance to practice the routine again.
Use a calm stop signal and have students put materials down, step back, and look at you. Then name what you saw as a safety risk, like, “I’m seeing tools used before reading directions,” or “I’m seeing too many people moving through the same space.”
Next, reteach the exact behavior students need. Model it again or ask one or two students to show the safe version. Then decide whether the class is ready to continue, needs to shift to smaller groups, or should move to a teacher-led demo.
You can also change the task in the moment by removing materials, assigning roles, or switching to observation and discussion. If the group is too excited or distracted to handle materials safely, pause the hands-on part and return to the science goal in another way.
I’ve inherited old materials or unknown substances and chemicals
Don’t assume science materials are safe because they were in the room when you inherited it. Treat unlabeled bottles or mystery substances as “do not use” until you can determine if they’re safe.
Start by separating anything unknown from student access. Then, make sure you don’t open, smell, pour, or mix unknown substances yourself. Contact the person or team responsible for science materials in your building or district. Ask them to identify the materials for you and how you should use or dispose of them.
Chemical safety isn’t just a classroom preference, and it isn’t just for students. If you don’t know what something is, ask for help and don’t include it as part of a student activity. Use a safer substitute, a demo with known materials, or a simulation until you can identify the old materials and ensure they’re approved for classroom use.
I need to ask my admin for safer STEM teaching conditions
Sometimes you can adapt an activity, but other times the setup itself needs support. If your room, materials, class size, or equipment make STEM instruction unsafe, document what you need and bring a clear request to your administrator.
Start with a concrete learning goal and safety concern, like “Students need eye protection for this activity,” or “We need a safe place to store materials.”
Then, explain the impact on instruction. Safe science conditions help students participate in hands-on learning and build STEM confidence. Without the right setup, you may need to replace the activity with something less hands-on.
Finally, keep your ask practical. Asking for a different room, safety gear, help removing unknown materials, or digital multimodal resources is likely something your school or department leadership can help with. Bigger asks may need higher-level review or district approval.
Admin request planner
Plan a clear request for safer STEM conditions
Use this teacher-facing planner to turn a safety concern into a clear, practical request. Focus on the activity, the barrier, the instructional impact, and the support students need.
1
Name the activity
What lab, investigation, STEM challenge, demo, or hands-on activity are students trying to do?
2
Identify the safety concern
Name the specific barrier: no sink, no goggles, crowded room, unsafe storage, unknown materials, or limited cleanup supplies.
3
Explain the instructional impact
What will students miss if the condition is not addressed? Think tool practice, data collection, design work, or hands-on investigation.
4
List the support needed
Request specific items or help, such as goggles, gloves, trays, bins, storage, disposal guidance, lab access, or smaller group scheduling.
5
Share the temporary fallback plan
Name what you will do until the safer condition is in place: demo, simulation, reading, lower-risk materials, smaller groups, or delayed hands-on work.
Draft the admin ask
Use this script as a starting point and adjust it for your school context.
Hi [Name], I’m planning a STEM activity where students will [activity]. To run it safely, we need [specific support]. Without that, I’ll need to use [fallback plan], which means students won’t get the same hands-on practice with [science skill or learning goal]. Could we talk about the safest option?
[A simple science safety checklist for teachers](id-checklist)
Use this checklist as a quick planning tool before, during, and after hands-on science. It brings the main safety routines together in one place so you can scan the activity, adjust the setup, and keep students focused on safe science.
Teacher checklist
Science Safety Checklist
Use this before, during, and after a lab, classroom investigation, STEM challenge, demo, or hands-on science activity.
Before the activity
Read the full procedure. Check each step before students handle materials.
Identify hazards. Look for spills, heat, glass, sharp tools, electricity, allergens, or crowding.
Confirm the setup. Check space, safety gear, supervision, cleanup supplies, and disposal steps.
Plan the fallback. Prepare a demo, simulation, reading, or lower-risk version if needed.
During the activity
Review directions first. Keep materials off-limits until students know the procedure.
Monitor movement and tool use. Watch how students move, share materials, and use equipment.
●Build safety knowledge first. Newsela STEM can help students learn safety routines, science tools, and investigation habits before materials come out.
●Connect safety to science literacy. Students can read, discuss, and apply safety concepts as part of learning how scientists work.
●Use safer paths when needed. Text sets, videos, and simulations can support STEM learning when a hands-on activity needs more prep, scaffolding, or risk reduction.
Newsela STEM can help you build safety knowledge before students begin hands-on work. Use science safety content, simulations, and real-world STEM lessons to provide students with shared language and safer ways to explore science concepts.
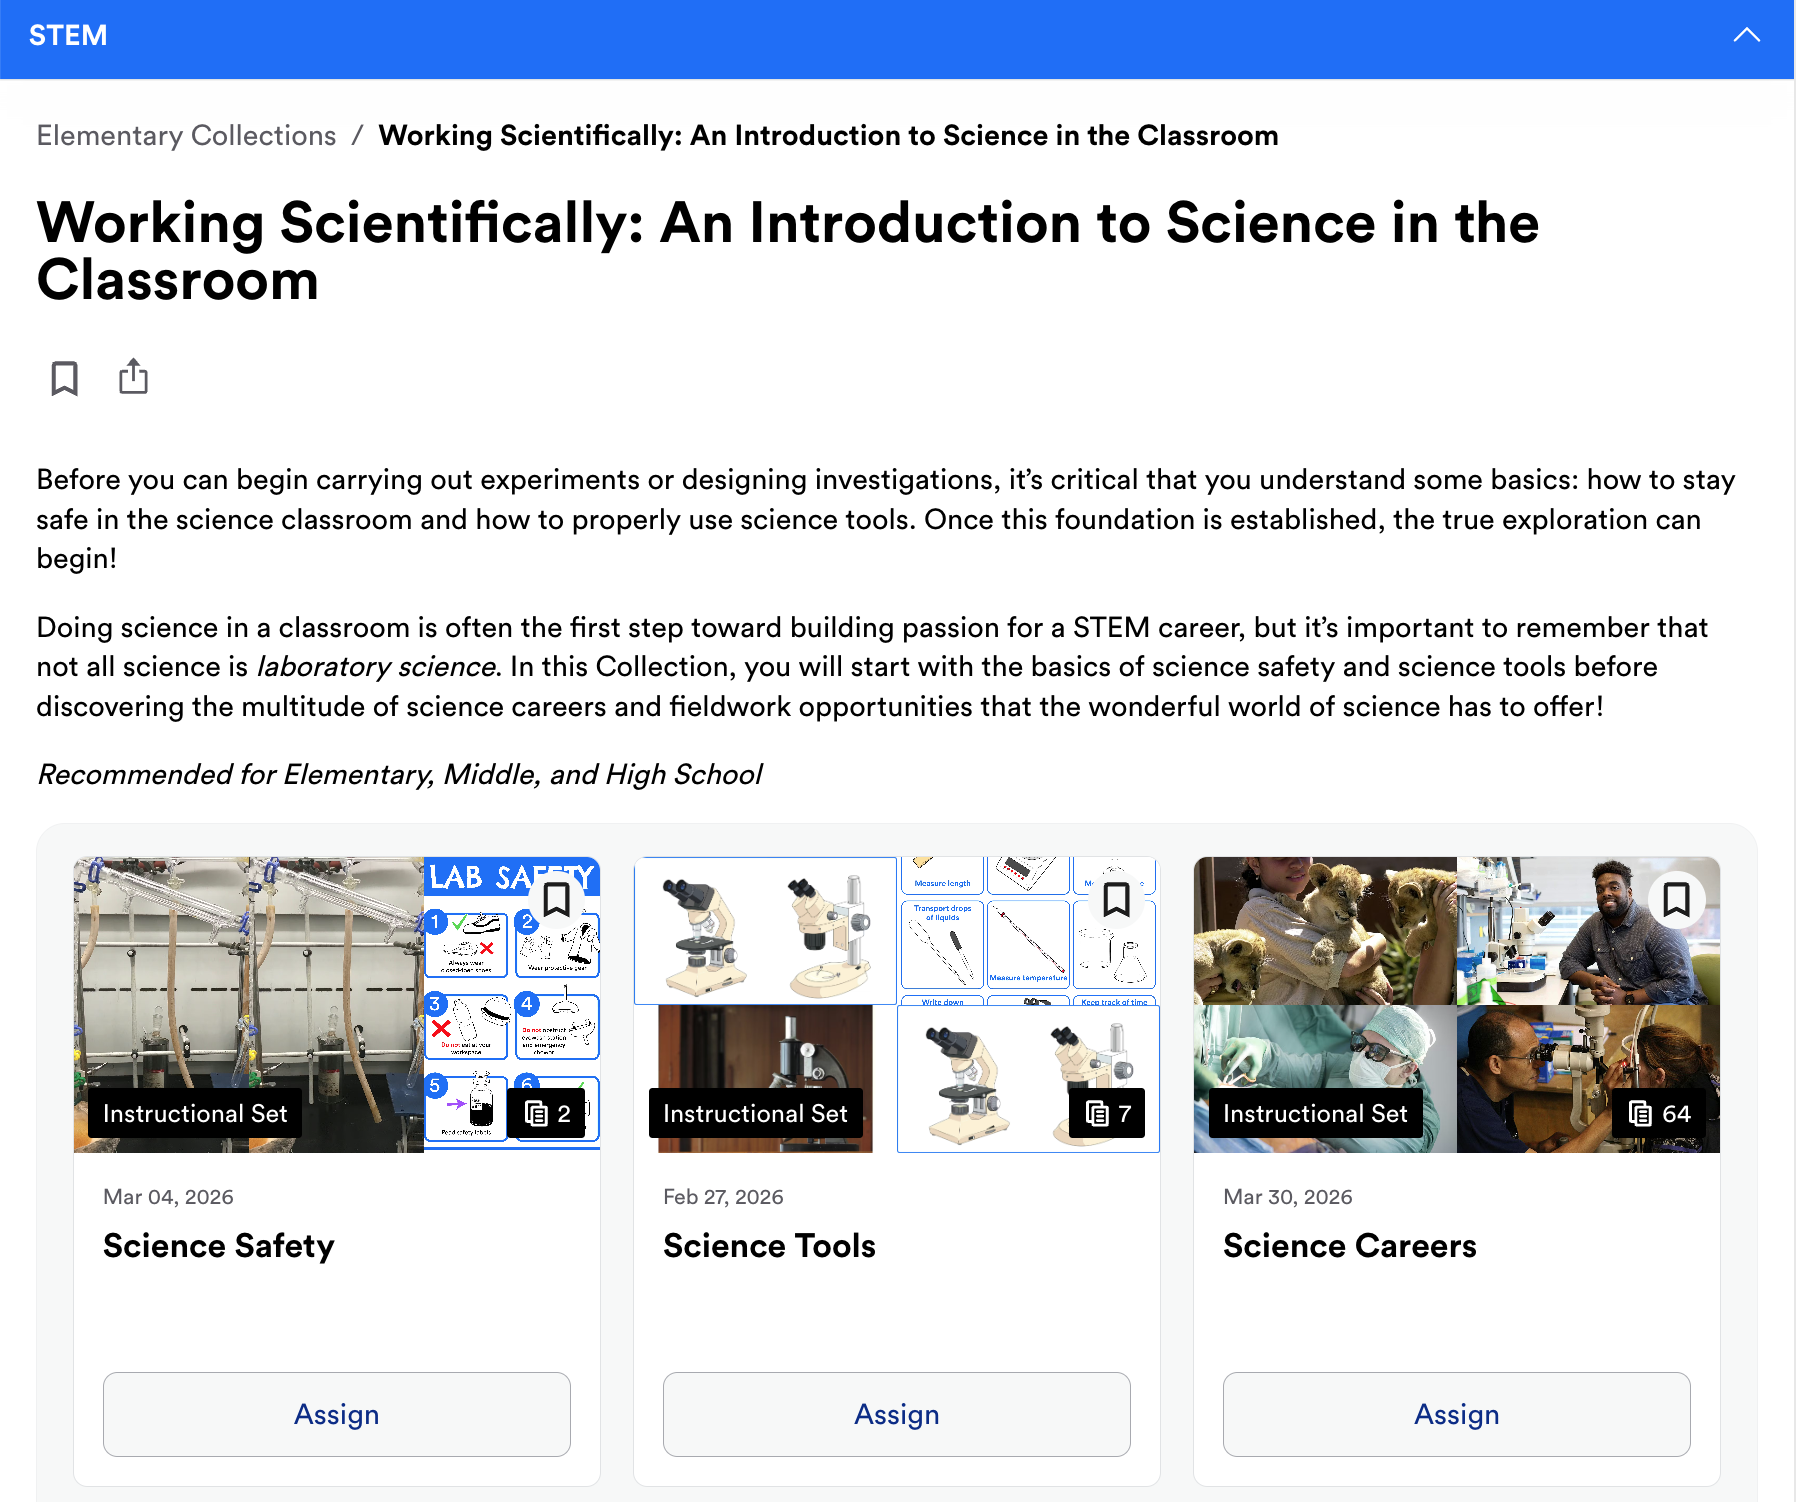
Start with the Working Scientifically Collection
Before students do science work, they need a foundation for what safe science looks like. The Working Scientifically: An Introduction to Science in the Classroom Collection helps set that foundation.
Use this collection early in the year, before your first major lab or before students begin a new hands-on activity. It introduces science safety, science tools, STEM careers, and fieldwork so students can see that safe habits are part of how scientists work in many settings, not just a lab.
You can use the collection with any grade band, which makes it flexible for your learning needs. Use the full collection for broader introductions or pull specific text sets when students need targeted support.
Explore the Working Scientifically Collection
Use this collection to introduce science safety, science tools, STEM careers, and fieldwork before students begin hands-on investigations.
Assign a safety or tools text set before a lab, investigation, STEM challenge, or demo so students have shared language before the activity starts.
Connect safety to real science work
✓Science safety helps students understand how to work responsibly.
✓Science tools content prepares students before they use classroom equipment.
✓STEM careers and fieldwork show how safety applies beyond the classroom.
Use the Science Safety text set to build shared language
Our Science Safety text set can help you introduce key routines before students begin hands-on work. Students can read about why safety matters, what safe behavior looks like, and how to respond when something goes wrong. Then you can connect the text set back to your classroom rules and safety agreement.
Another option is to use the text set as a quick reset later in the year, like after you return from winter break. This helps keep science safety ties to learning all year, instead of just becoming a one-time reminder.
Science safety text set
Build shared safety language before hands-on work
Use the Science Safety text set before labs, classroom investigations, STEM challenges, or demos so students can connect safety rules to the reasons behind them.
Assign one safety text before materials come out. Then connect the reading back to your class rules, safety agreement, and student-friendly callbacks.
Quick classroom uses
✓Preview safety vocabulary before a hands-on activity.
✓Use a text as a reset when students need to revisit routines.
✓Connect safety expectations to what scientists do in real investigations.
Use the Science Tools text set before students handle the equipment
Before students pick up any tools, use the Science Tools text set to build their background knowledge. This helps students slow down and use tools with purpose. They can learn how a tool works, how scientists use it, and why careful handling matters.
You can also connect the text set to your safety routines. Ask students: “What tool will we use today? What should we do before we touch it?” When students understand the tool, the directions, and the reasons for a rule, they’re more likely to work carefully.
Science tools text set
Prepare students to use science tools safely
Use the Science Tools text set before students handle equipment so they understand what each tool does, how scientists use it, and why careful tool use matters.
Assign a short reading before students use measuring tools, microscopes, thermometers, balances, or other science equipment for the first time.
Quick classroom uses
✓Preview what a tool is used for before students handle it.
✓Connect tool use to careful observation and accurate data.
✓Revisit the text set when students need a reset on tool routines.
Watch Generation Genius videos to learn about science safety in multiple modalities
Reinforce what students read about science safety and why it matters in real-world science situations with Generation Genius videos. The “What Is Science?” videos for elementary and middle school grade bands explore how these practices work in practice, while the “How to be a scientist” video explores how real scientists use safety at work to run investigations and collect results.
Use simulations and content when hands-on learning needs a different path
Sometimes the safest version of a science activity isn’t hands-on at all. That’s where simulations, videos, and science content can help. Students can test ideas, observe patterns, and explain cause and effect without adding risks.
As part of Newsela STEM, PhET simulations will let students explore science concepts in an interactive format. Use them before a hands-on investigation, when your room setup isn’t ideal, or after an activity to help students connect what they observed to the larger science concept.
Each simulation will also have an NSTA lesson that’s tailored to the multimodal content students interact with. This reduces planning time and provides explicit instructional support to guide the use of simulations in the classroom.
Simulations can’t replace hands-on science every time, but they can give you another safe path when you need to make changes to the activity.
Simulation support
See how simulations support safer science learning
Use simulations when students need more background knowledge, more practice with a concept, or a safer way to explore science before handling materials.
Use simulations when hands-on learning needs support
✓Preview a concept before students work with materials.
✓Give students a safer way to test ideas when equipment or setup is limited.
✓Use simulations as a fallback when a hands-on activity needs more prep or scaffolding.
Help students explore science safely
When students understand the safety rules of science, they can focus more on the activity at hand. And when an activity isn’t the right fit for your classroom, you still have options.
With Newsela STEM, you can support science safety before students ever touch materials. Use texts, resources, and simulations to build the science literacy students need to feel confident during hands-on learning.
Not a Newsela subscriber yet? Sign up for an account to start your free 45-day trial of all our premium subject products, including Newsela STEM.
Everything you need to accelerate learning across ELA, social studies, and science
Discover 7 challenges teachers can have when incorporating STEM learning into their classrooms, and ways you can combat them for a more seamless implementation.
What Is STEM Education and How Does It Fit Your Classroom?
Discover what STEM education is, why it’s so important, and how you can overcome challenges to seamlessly integrate STEM lessons into any classroom or curriculum.

 Products Overview


.jpg)

.jpg)
